A little less conspicuous - Part 1: Introduction
On the very day our caretaker Dutch cabinet mandated the obligatory use of corona passports (CoronaCheck) in almost all places of leisure and large public gatherings, I decided to write something to inspire anyone to be a little less conspicuous in our day-to-day digital life and to make an effort to know what’s going on. It really wouldn’t harm you, or anyone for that matter and makes just plain sense.
“Why?” You may ask. For one, the war on who gets to gather and analyze your PII in the most effective and creative ways possible, is still going strong. One of the latest moves by Google is to try and make all your initial web requests initially go through their own DNS servers (aka the ‘internet phone book’). These servers are used by anyone who would like to match a FQDN like ‘www.google.com’ with its IP address ‘142.250.xxx.xxx’. In other words everybody uses this phone book! Initially an updated Chrome browser exposed a new DNS-over-HTTPS (DoH) setting, actually named rather inviting ‘Secure DNS’. This setting was enabled by default, using the setting to use Googles servers of course. While it actually is a safer and more private way to handle this kind of traffic as you are effectively not leaking any ‘phone book’ requests to your ISP, it also enables Google to monopolize the DNS request handling business. Furthermore devices are being created (Google Stadia, Chromecast, Nest, etc.) that incorporate hardcoded Google DNS Server forwarders using the before mentioned DoH protocol. These devices will encapsulate (effectively hiding) this phone book traffic in regular HTTPS encrypted traffic on the network so they are not easily detectable by yourself or anyone else without doing some serious CPU intensive ‘deep packet inspection’.
As the rest of this article will show and provide a solution for, one of the most effective ways of filtering out phishing, bot-network, advertising and telemetry network traffic is by doing this on the DNS level. As Google (and others, to be fair) tries to make this impossible we have to hurry!

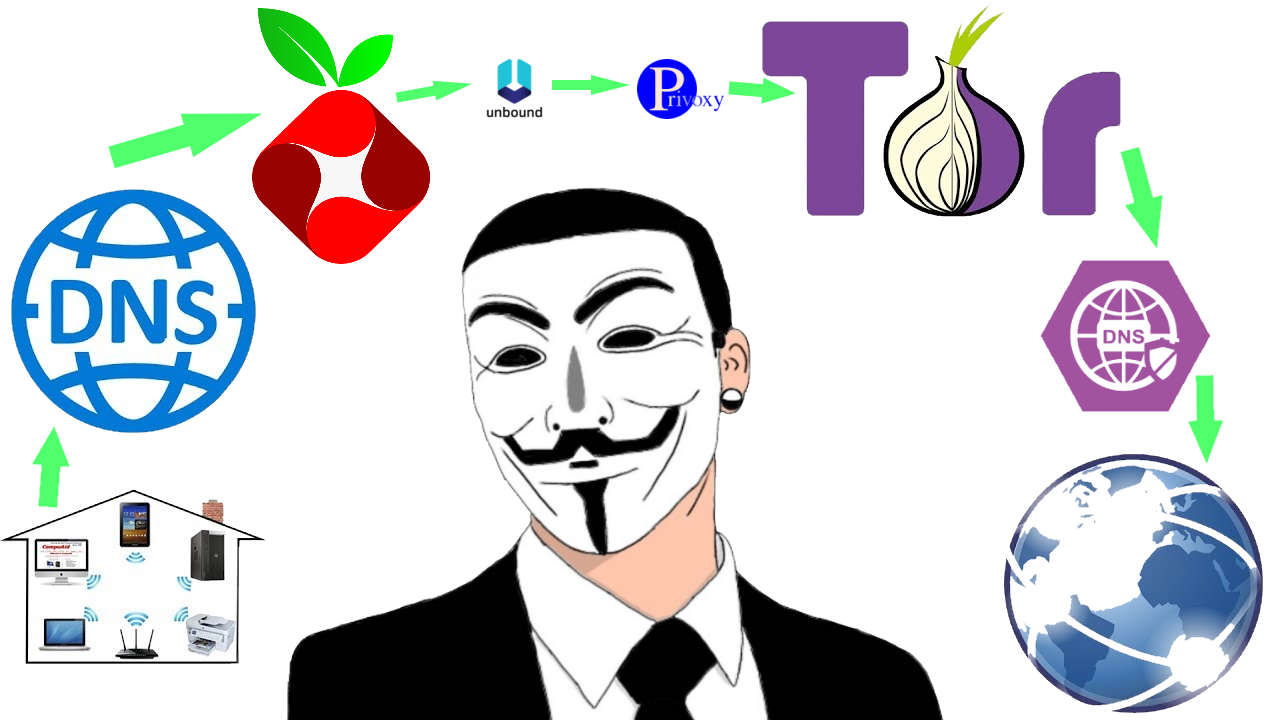
Most of what I describe in this series can be found elsewhere on the web but never combined in a practical comprehensive way like this. Also most of the open source software packages prescribed in this series have been around for a very long time and have a great track record. Finally, many thanks to Cloudflare for the basic image design above.
This series will require some basic technical know-how from your part, but actually it is not that hard. Since I am actually invested in the Microsoft Cloud ecosystem I tend to use mostly Microsoft services, but going ‘Open Source’ a bit on this one is an eye-opener. Especially since Microsoft and Linux are not mutually exclusive anymore, hosting the proposed Linux (Debian) systems in Azure is certainly a possibility (if you mind the pitfalls), so is using Windows Subsystem for Linux (WSL2) and most importantly the Linux distro I will be using makes it so easy to start with. You might want to read up on:
- The ‘Internet Model’.
- How do those data packets flow?
- Basic ‘Debian Linux ‘Raspberry PI’ commands’
- Rest assured, you won’t actually need to buy a device or anything and this list is not that long
And now for something very important…
![]() Disclaimer
Disclaimer
This article and follow-ups have no ambitions to totally anonymize anyone on the internet, but just to make it a little bit more difficult for certain parties (ie. ISP’s, governments, advertising moguls and the likes) to track you or your small company.
The proposed setup is meant for demo purposes only and is certainly not production-ready without extra precautions and explanations put in place.
The packages, distributions and commands used and referred to in this article are valid for the most recent software versions available at the date of article publication. There is no guarantee the routines and packages described here will keep working at a later date.
Furthermore rest assured, since the internet (no capital here!) was created with absolutely no security or privacy in mind, it will never deliver on any promise of these concepts. But why hand-over all your data on a platter and be profiled? It’s like peeing naked in the middle of Grand Central Station and have everyone stare at you, would you really? At least put on a dress and pee in a bucket underneath you, doing that some people won’t even notice you are there.
This article is here to provide you a bucket. Please bring your own dress.
What’s up with the internet?
In short, the core TCP and UDP transport protocols that rely on a mostly ‘fixed’ and ‘depleting’ set of network IP addresses that are in charge of fueling IP traffic on the internet can be misused too easily leading to all kinds of denial of service (DDoS) and spoofing shenanigans we hear of almost daily. Additionally your traffic and personal data is far too easily ‘leaked’ and can be tracked back to you personally, with ease. Too liberal browser (settings) allowing cookies and other persistent tracking assets to be placed together with the current app models delivered to us by ‘Big Tech’ are at the core of all the issues with online privacy. Ultimately leading to several massive PII data leakages we see today.
Also keep in mind that all application protocol endpoints we connect to every day, usually implicitly or by proxy, like:
- DNS (what IP address goes with what fully qualified domain name?) root servers
- NTP (what’s the time?) time servers
only allow plain text, unsecured traffic using the aforementioned transport protocols, by design. Fixing these core services is probably only possible when someone ‘rethinks’ the internet starting at the hardware layer and has a clear ‘security & privacy by design’ philosophy.
Nevertheless, what already is pretty mainstream today - and a good thing at that - is the usage of secured HTTP (HTTPS) connections to fetch/push the content apps and websites provide/require, but these connections, as posed earlier in this article, to sites and apps are only a part of our digital footprint and certainly not the most important to secure.
![]() Consider this
Consider this
If you build a very nice and expensive ‘African blackwood’ made skylight for your house (ie. buy a fancy HTTPS certificate) which in turn is built on the pristine swampland foundations of the hurricane-prone Mississippi delta (ie. tunneling that websites traffic through a SSL-terminating reverse proxy hosted by a third-party in a ‘banana’ republic with a questionable or at least uncheckable privacy statement), is that a sane thing to do? Get your priorities straight and go fix the foundations first, right?
DietPI
Regular Linux distributions can be overwhelming and need a lot of tinkering to get right. In comes ‘DietPi’!
DietPI will take all annoying and time consuming initial setup stuff away and put in place a great fully usable, very minimal, distribution based on Debian (the same core the popular distro Ubuntu is based on) with great optimized defaults for both the OS and Apps you want installed. This thing is FAST! Speaking of installing apps, like I said this distro has optimized versions of many nice Apps (aka packages) available to install at your leisure through the dietpi-software -> 'Browse Software' command. Furthermore because DietPI is based on Debian the apt-get command is available to get Apps installed which are not available through the dietpi-software install menu.
Images are available for many pieces of hardware (especially relevant for Raspberry PI owners). Also some (other) ARM devices are supported. I would like to point out two very interesting additional options:
- Images for PC/VM ( DietPi Site -> Download -> PC/VM)
- Script to create DietPi from existing Debian install ( DietPi Site -> Download -> Other)
I used the Hyper-V image option because I already run a Hyper-V Server, so for me that meant a quick start. Option 2 is interesting as it might be used to convert a Cloud (ex. Azure) hosted Debian instance or a local WSL Debian installation to DietPi. I did not test this, but it might be worth checking out (note to self).
![]() As a small side note
As a small side note
Sadly Microsoft are not offering a successor to Hyper-V Server 2019 in their Server 2022 line-up, so I will be looking for another free hypervisor at some point.
On the right Windows versions you can of course install Hyper-V yourself and alternatively you could use VMWare or VirtualBox to get started. Images for those virtualization platforms are also available at dietpi.com.
For best results and certainly if you want to service an entire local area network choose a machine that will be ‘always on’. But for a single machine ‘test’ setup it is good enough to have the DietPi VM(s) running there and immediately make use of some ‘DNS sinkholing’ action.
Full architecture to be achieved
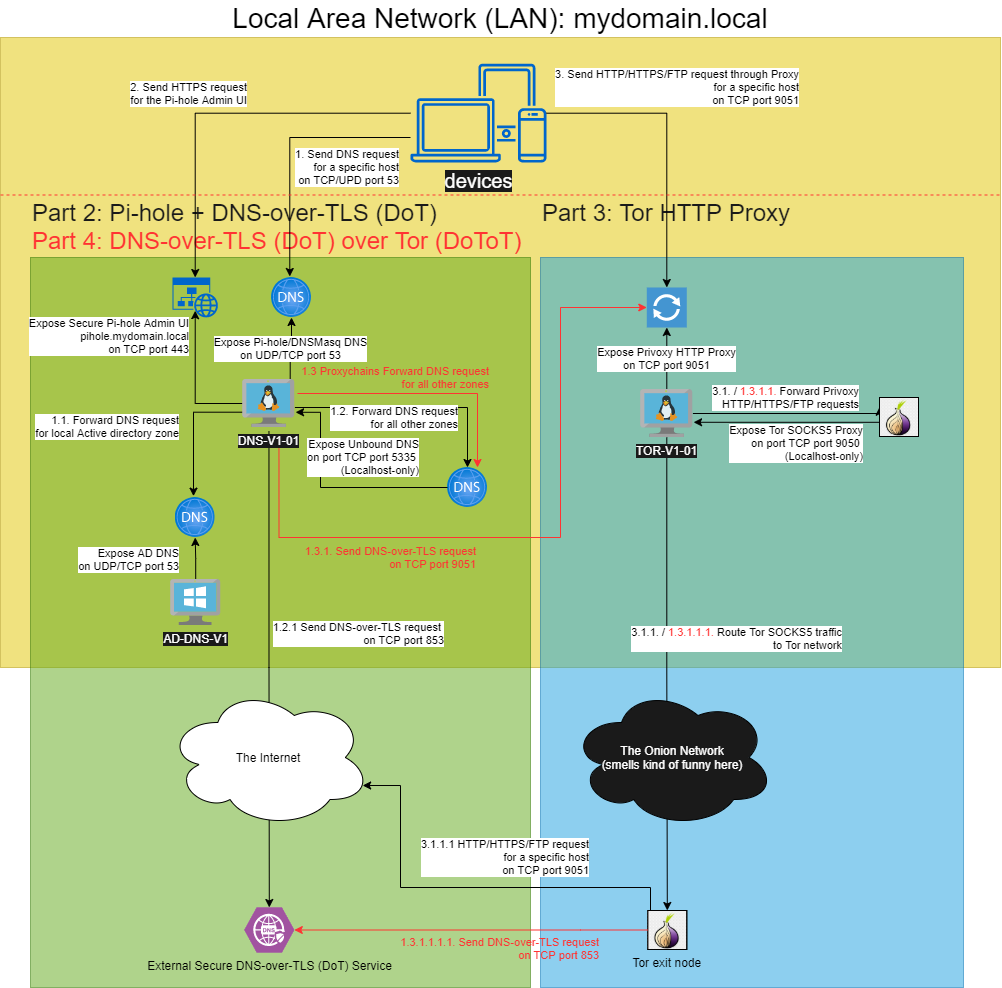
This and further articles in this series all count up to the following flexible architecture where it is possible to choose a security / privacy model that suits your purpose. Part 2 and Part 3 can be set-up and be used ‘on demand’ fully separated. It is only when Part 4 is considered that both technologies presented in Part 2 and 3 are combined and as such both are required to operate together. The red texts in the architecture diagram below are specific for Part 4 of this series.
As I did this setup three times, in preparation of writing this series, it only took me an hour to have the entire setup (Part 2, 3 and 4) replicated (reusing existing web server certificates exempted). All this without any IaC optimizations I must add. Building this set-up through a DevOps pipelining might be worth the effort at some point (note to self).
 Figure 1: The DoToT Sinkhole and Tor Proxy Architecture: where the DNS sinkhole functionality combined with DNS-over-TLS (DoT)forwarding for added security is provided, together with a Tor HTTP Proxy to turn ordinary devices and browsers into more anonymous entities when required. Ultimately this leads to an ‘always on’ DNS-over-TLS-over-Tor implementation for added permanent anonymity and security on the DNS plane.
DietPI Initial Installation
For the remaining you will need:
- A little bit of interest in and basic knowledge of computer infrastructure, networking and software ;-)
- Admin access to your Internet router + firewall
- Admin access to your local DNS and DHCP servers
- Admin access to your local computer or a virtualization appliance
- Optional: Knowledge of certificate management
Now it is time to begin. Start the DietPi installation as follows:
- Download the right image: DietPi Site -> Download
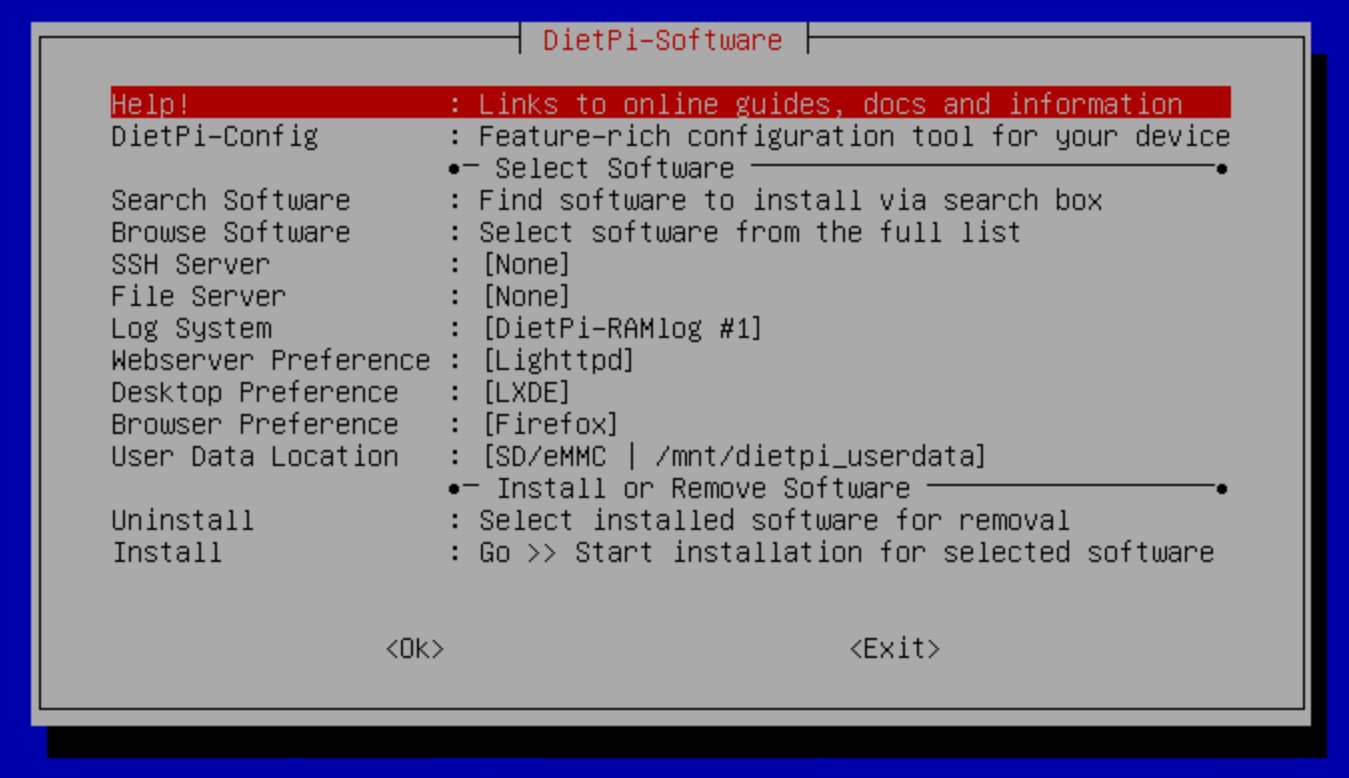
- Follow the Installation documentation to get you image running and show the following screen
 Figure 2:
 dietpi-software: a neat functional ASCII-based menu with a CGA-like color scheme:dietpi-software. Reminds me of the MSDOS good old days. Who needs Dolby Vision? - Since I am running a DietPi VM on Hyper-V Server I selected ‘None’ the ‘SSH Server’ component as working through the Hyper-V console was just fine for me.
- Start
DietPI-Configand it will show the following screen Figure 3:
 dietpi-config - DON’T PRESS ANYTHING NOW
- Go to ‘Part 2’ and/or ‘Part 3’ below, depending on which DietPi instance you want to install, for the remainder of the instructions.
Continue reading
This series comprises of four parts:
- This post - Part 1: A little less conspicuous - Introduction
- Part 2: A little less conspicuous - The DNS Sinkhole on running your own DNS Pihole with secure Admin WebUI + Unbound + TLS resolvers on DietPi
- Requirements: None, can run Standalone
- Achieves: General Ad blocking for your network + Obscure DNS traffic for your ISP by using DNS-over-TLS resolvers
- Part 3: A little less conspicuous - The Tor Proxy on running your own Tor SOCKS5 Proxy + Privoxy HTTP Proxy on DietPi
- Requirements: None, can run Standalone
- Achieves: Have the option to ‘go anonymous’ on the web when you want it, also for mobile devices (iOS, Android)
- Part 4: A little less conspicuous - Obscuring DNS traffic on routing your DNS Traffic through Tor
- Requirements: Parts 2 and 3
- Achieves: Obscure already Secure DNS-over-TLS Traffic from your DNS resolvers + Use Tor Browser and Pi-hole together
